Suya (West African Chicken Kababs)

Posted on

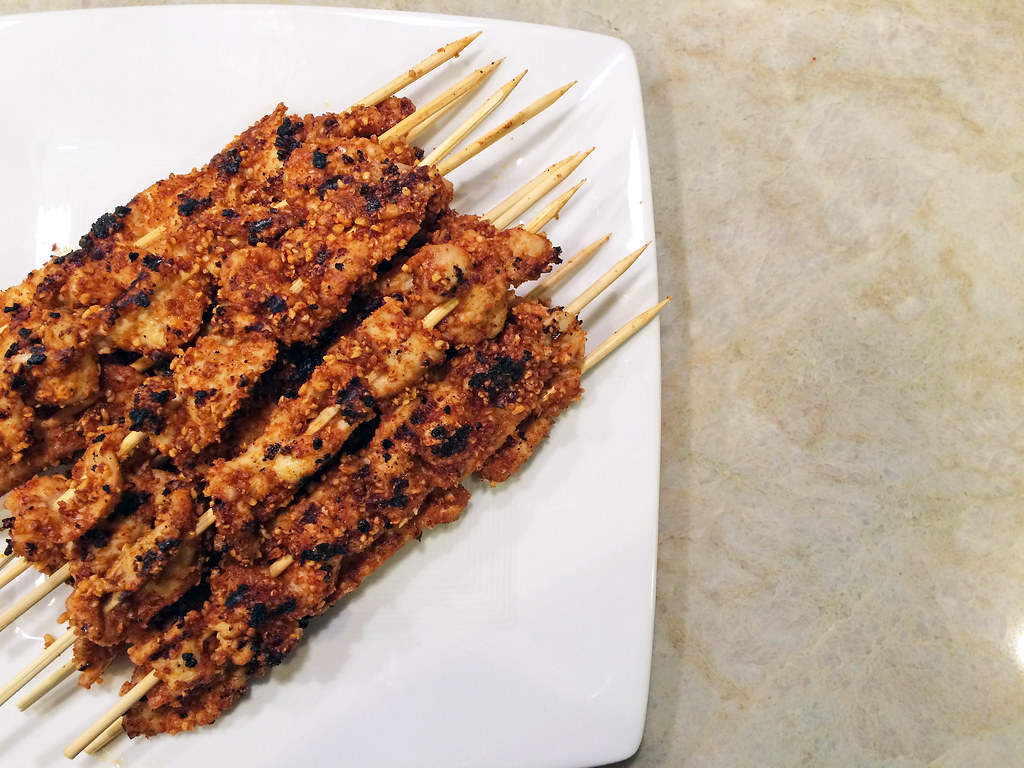
Suya, where have you been all my life? Suya is a grilled and skewered meat dish in many parts of West Africa, including Nigeria. These chicken suya are abundantly flecked with crushed peanuts and spices, adding a wonderful texture and layer of heat.

I often cook suya on a cast iron grill but an outdoor charcoal grill will of course be more flavorful. They make a delicious appetizer served alone, or you can serve them with rice for a filling entree.

Suya (West African chicken kebabs)

Ingredients:

1 cup roasted peanuts
1 inch peeled ginger
3 garlic cloves, crushed
1 chicken bouillon cube
2 teaspoons paprika
1 1/2 teaspoons onion powder
1/4 teaspoon cayenne pepper
1 pound skinless, boneless chicken breast, sliced crosswise 1/4 inch thick
1/4 cup canola oil
salt and pepper
20 wooden skewers, soaked in water for 30 minutes

1. In a food processor, pulse the peanuts until finely chopped. Add the ginger, garlic, bouillon cube, paprika, onion powder and cayenne and pulse until a coarse and crumbly mixture forms. Spread the peanut mixture on a large plate.

2. Rub the chicken 
with 2 tablespoons of the oil and season with salt and pepper. Thread the chicken onto the skewers and press into the peanut mixture to coat both sides. Arrange the skewers 
on a plate. Let stand at room temperature for 30 minutes.

3. In a cast iron grill pan, heat 1 tablespoon of the oil. Cook the chicken in batches over moderate heat, turning carefully, until deep golden and the chicken is cooked through, about 8 minutes. Repeat with the remaining oil and chicken. Serve warm.

Kelp and Mushroom Relish

Posted on

My first taste of kombu tsukudani was as a university student in San Francisco. My roommates were Japanese (hi Sanae!) and we’d often head to Nijiya Market in Japantown to do our grocery shopping. The first time I tasted this kelp relish, I fell in love with the salty, slightly-sweet, oceany flavor.

This tastes perfect on top of rice or as a filling in onigiri, but I also like it eat it by itself. If you make homemade dashi and find yourself with lots of leftover pieces of kombu seaweed, this is a perfect use. I like to add enoki mushrooms to the the mix for a textural contrast, but it tastes just as good without.

Kombu tsukudani

Ingredients:

About 50 square inches kombu, leftover from making dashi stock (or equivalent amount soaked in cold water for 20 minutes)
3 tablespoons rice vinegar
1 teaspoon sugar
1 tablespoon sake
3 teaspoons mirin
5 tablespoons soy sauce
1 cup enoki mushrooms, trimmed and cut into 1-inch lengths

1. Slice the kombu into narrow strips 1 1/2 inches long. In a saucepan, bring 2 cups of water to a boil and add the vinegar. The vinegar helps tenderize the kombu and eliminate bacteria.

2. Reduce the heat to maintain a simmer and cook the kombu for about 8 minutes. Test for doneness by pinching a strip of kombu: it should yield easily. If it does not, continue cooking for another 5 minutes. Drain under cold water and rinse.

3. Rinse and dry the saucepan and add the sugar, sake, mirin, and soy sauce. Bring to a simmer over low heat and add the kombu. Simmer for 4 minutes and add the mushrooms. Cook over low heat for 5 minutes, stirring often to not let the liquid scorch.

4. When the kombu looks glazed and the liquid has mostly reduced, remove the pan from the heat, let cool to room temperature, and serve.

Manhattans

Posted on

I know what you’re thinking. Manhattans? Too easy. But I beg to differ. I’ve had many a sad Manhattan: too bitter, too sweet, too weak. It’s easy to go wrong. I’m taking it back to basics. Artisanal vermouths are all the rage right now, but you know what? I actually prefer Martini brand vermouth in my Manhattans. It’s smooth and it’s balanced. Don’t knock it until you’ve tried it.

Manhattans

Ingredients:

1 cup bourbon, preferably Bulleit
2/3 cup red vermouth, preferably Martini Rosso
4 dashes Angostura bitters
4 thin slices orange
4 maraschino cherries

1. Combine bourbon, vermouth, and bitters in a mixing glass.

2. Divide cocktail among 4 ice-filled rocks glasses. Garnish each drink with an orange slice and cherry.

Orange Lentil Dal with Coconut Milk and Kale

Posted on

This is my favorite dal recipe, and I don’t say that lightly. From Iranian adassi to Sri Lankan parippu, I’ve never met a version of dal I didn’t like, but I always come back to this one. Creamy, coconuty, and redolent with warm spices, this dal is what dreams are made of.

Make sure to use actual orange (or red) lentils here — not yellow split peas (chana dal/gheymeh). Toor dal will also work in a pinch. Split peas won’t give that velvety texture that lentils will. The chicken stock isn’t traditional, but it adds a savory layer of depth. This is alchemy in a bowl.

Yellow lentil dal with coconut milk and kale

Ingredients:

3 tablespoons coconut oil
1 teaspoon cumin seeds
1 teaspoon fennel seeds
1 teaspoon ground turmeric
2 onions, chopped
3 garlic cloves, chopped
2 tablespoons ginger, chopped
1 green chili pepper (such as Serrano), thinly sliced
1 quart chicken stock or broth
One 14-ounce can coconut milk
2 cups orange lentils, cleaned
1 bunch kale, stemmed and leaves coarsely chopped (about 4 cups)
1 tablespoon lemon juice
Salt
Pepper

1. In a large pot, heat 1 tablespoon of the coconut oil. Add the cumin, fennel and turmeric and cook over moderate heat, stirring constantly, until fragrant, about 1 minute. Stir in the remaining 2 tablespoons of coconut oil and the onions and cook, stirring occasionally, until slightly browned, about 8 minutes. Add the garlic, ginger and chili pepper and cook, stirring, for 2 minutes. Spoon half of the spiced onion mixture into a small bowl and reserve.

2. Add the chicken stock, coconut milk, and lentils to the saucepan and bring to a simmer. Cook over moderately low heat, stirring occasionally, until the lentils are tender, about 20 minutes. Add the kale and cook until tender, about 5 minutes. Stir in the lemon juice and season with salt and pepper.

3. Spoon the dal into bowls. Top with the reserved onion mixture and serve warm.

Roasted Broccoli with Nutritional Yeast

Posted on

I get it. Nutritional yeast doesn’t make your tastebuds salivate and broccoli never got anyone too excited. But this easy side dish is virtuously healthy and actually tastes really, really good. Never had nutritional yeast? Think of it as umami powder: slightly cheesy and super savory. Sprinkle it on your greens and you’ll be asking for seconds in no time.

Roasted broccoli with nutritional yeast

Ingredients:

2 heads of broccoli, cut into florets and similarly-sized pieces of peeled stalk
2 teaspoons virgin coconut oil, warmed to liquefy
5 tablespoons nutritional yeast
salt and pepper

1. Preheat oven to 425 degrees Fahrenheit. Toss vegetables with oil on a rimmed baking sheet to coat and season with salt and pepper. Roast until golden brown and tender, 20–25 minutes. Let cool slightly, then toss with nutritional yeast.