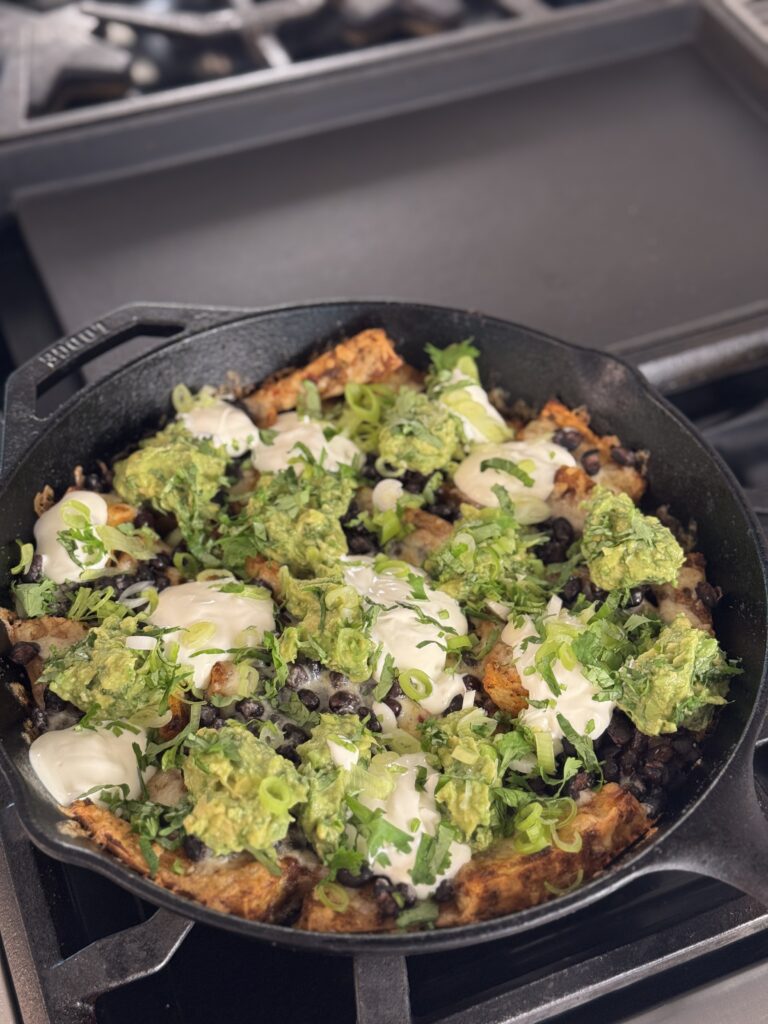
Classic Fried Rice

Posted on

I love fried rice in almost all its permutations: crab fried rice, kimchi fried rice, Thai fried rice, you get the pictures. Cold rice, hot pan, a handful of basics from the fridge somehow turning into something better than the sum of its parts. This classic version is fast, comforting, a little smoky around the edges, and exactly the kind of dinner that saves a weeknight without feeling like a compromise.

Ingredients:
  • 2 to 3 cups cooked white rice
  • 1/4 cup avocado oil
  • 2 eggs, lightly beaten
  • 4 ounces ground chicken
  • 2 ounces shrimp, chopped into 1/4-inch pieces
  • 1/4 teaspoon white pepper, plus more for serving
  • 1 tablespoon plus 1 teaspoon soy sauce
  • 1 teaspoon sugar
  • 2 teaspoons minced garlic
  • 2 teaspoons minced ginger
  • 1/2 teaspoon sugar
  • 1 teaspoon cornstarch
  • 1/4 teaspoon baking soda
  • 1/2 small onion, chopped
  • 1 small carrot, peeled and diced
  • 2 green onions, chopped
  • 1 teaspoon oyster sauce
  • 1 teaspoon sesame oil
  • 3/4 cup frozen peas
  • Salt, to taste
  1. Combine the chicken, shrimp, white pepper, 1 tablespoon soy sauce, garlic, ginger, sugar, cornstarch, and baking soda in a bowl and mix vigorously with your fingers until the mixture feels slightly tacky, about 1 minute. Set aside. (Mixture can be made up to two days ahead and stored in the refrigerator until ready to use.)
  2. Heat a wok over high heat and add 2 tablespoons avocado oil and swirl to coat. Reduce the heat to medium and add eggs into the center of the wok and cook, lightly swirling the work, until the eggs are puffy, about 30 seconds. Using a spatula, carefully flip the eggs and cook for another 20 seconds, then transfer the eggs to a bowl and set aside.
  3. Return the empty wok to high heat and add one tablespoon oil, then add the chicken mixture and cook, stirring, until the meat is starting to cook through, about 2 minutes. Add the onion and carrot and cook, stirring, until lightly softened and fragrant, about 1 minute. Transfer to the bowl with the eggs.
  4. Return the wok to high heat and add the rice and cook, stirring and tossing, until the rice is starting to turn pale brown and toasted, about 3 minutes. Add the green onions and stir-fry until fragrant, about 30 seconds.
  5. Return the chicken mixture, vegetables, and egg to the wok, using the spatula to break up the egg into small pieces as you mix everything together. Add the oyster sauce, soy sauce, sesame oil, and peas, and toss until well combined. Season with salt and pepper to taste, and serve.

Kale Ohitashi

Posted on

Ohitashi is a Japanese side dish made by blanching vegetables and soaking them in a light dashi and soy-based broth. This simple version features kale and it’s perfect because it’s easy, you can make it ahead of time, it’s super healthy, and it tastes great. Serve it room temperature alongside a Japanese meal and feel free to replace the kale with Swiss chard or any other hearty, leafy greens.

Ingredients:
  • Salt
  • 1/2 pound bunch curly kale (about 1 punch), bottom stems trimmed and discarded
  • 1 1/2 cups dashi
  • 1 teaspoon soy sauce
  • 1 teaspoon mirin
  • 1 tablespoon bonito flakes
  1. Bring a medium pot of salted water to a boil. Prepare a medium mixing bowl full of ice water in the meantime.
  2. Blanch the kale in the boiling water until it is tender but still retains its texture, about 2 to 3 minutes. Transfer the kale to the icy water and let it cool. Drain the kale in a colander and squeeze to remove excess water.
  3. Combine the dashi, soy sauce, mirin, and 1/2 teaspoon salt in a small saucepan over medium heat and cook, stirring, until the salt dissolves. Let the dashi mixture cool and pour it into a medium bowl. Add the kale, stir, and cover the bowl. Refrigerate for at least 2 hours or up to 24 hours.
  4. When ready to eat, gently take the kale out of the bowl, leaving the liquid behind. Line up the kale leaves on a cutting board and gather them into a long bundle and cut crosswise into 2-inch pieces and arrange them on a serving plate. Spoon on about 3 tablespoons of the reserved liquid or more to taste. Sprinkle the bonito flakes on top and serve.

Antipasto Salad

Posted on

Whatever happened to antipasto salad? (Unfortunately) relegated to the ’90s, I think of it as a chopped salad’s long-lost relative. Italian herbs, cheese, and salami may not have made the the healthiest salad a few decades ago, but this updated version features kale, radicchio, and avocado too for a Californian take on an updated classic. Serve this as a side to pasta, as I do, or eat it as a light meal on its own. Either way, it’s delicious.

Ingredients:

  • 1 small or medium garlic clove
  • 1/3 cup good quality olive oil
  • 1/4 cup red wine vinegar
  • 2 teaspoons fresh chopped thyme
  • 1/2 teaspoon dried oregano
  • 1/4 teaspoon crushed red pepper flakes
  • 8 ounces mozzarella cheese, drained and cut into 1/2-inch pieces
  • 4 ounces deli-sliced salami, cut into 1/2-inch pieces
  • 1 bunch kale, stems and ribs removed, leaves coarsely chopped (about 2 cups)
  • 1 15-ounce can chickpeas, drained and rinsed
  • 1 shallot, thinly sliced
  • Black pepper
  • 1 head radicchio, cored and coarsely chopped
  • 1 avocado, halved, peeled, and cut into 1-inch chunks
  • Grated Parmesan cheese, for serving
  1. Mince the garlic on a cutting board, then sprinkle with a pinch of salt and chop and scrape the garlic and salt back and forth with the flat side of a knife until it forms a mostly smooth paste.
  2. Scrape the garlic paste into a large serving bowl and whisk in the olive oil, vinegar, thyme, oregano, and red pepper flakes. Add the mozzarella, salami, kale, chickpeas, and shallot and season with salt and pepper. Toss to combine, then gently stir in the radicchio and avocado. Sprinkle with Parmesan and serve.

Italian-ish Ramen

Posted on

This is the most comforting soup you’re going to have this winter. If tortellini soup and ramen had a baby, this would be it.

Ingredients:
  • 2 large chicken thighs, preferably skinless and boneless
  • 3/4 teaspoon black pepper
  • 1 teaspoon salt, divided
  • 2 tablespoons avocado oil
  • 4 cups lower-sodium chicken stock
  • 3/4 ounce Parmesan cheese, grated (about 3 tablespoons), divided
  • 8 ounces uncooked thin spaghetti 
  • 10 basil leaves, sliced, divided
  • 4 soft-cooked large eggs, peeled and halved lengthwise
  • Calabrian chile paste, for serving
  1. Pat chicken dry using paper towels; sprinkle with pepper and 3/4 teaspoon salt. Heat oil in a large Dutch oven over medium-high. Place chicken and cook, undisturbed, until crispy and golden brown, about 7 minutes. Flip chicken, and cook until browned on other side, about 4 minutes. Carefully remove and discard all but 2 tablespoons of rendered chicken fat from Dutch oven, leaving chicken in Dutch oven.
  2. Add chicken stock and 1 1/2 tablespoons Parmesan to Dutch oven; bring to a simmer over medium-high. Reduce heat to medium-low; cover and cook about 15 minutes.
  3. While chicken cooks, bring a large pot of salted water to a boil over high. Add pasta, and cook 1 minute less than package directions for al dente.
  4. Remove chicken from Dutch oven, and let cool slightly, about 10 minutes. Shred chicken (discard skin and bones if using), and set aside. Reduce heat under Dutch oven to low; sprinkle stock mixture with remaining 1/4 teaspoon salt, plus more to taste. Add shredded chicken and half of sliced basil (about 1 tablespoon) to stock in Dutch oven. Bring to a simmer over medium-high. Drain pasta, and add to simmering stock mixture in Dutch oven. Cook until pasta is al dente, about 1 minute.
  5. Divide pasta, chicken, and broth among 4 bowls. Top evenly with eggs, remaining 1 1/2 tablespoons Parmesan; remaining basil, and a small spoonful of Calabrian chile paste, to taste.

Kimchi Sundubu Jjigae

Posted on

This Korean tofu and kimchi stew is the ultimate cold weather comfort food. Of all the jjigaes (Korean stews), this one is my favorite. Briny, spicy, and deeply savory, there’s a reason why it’s one of the most popular dishes at Korean restaurants. This was my go-to order at Pyeong Chang Tofu House in Oakland for ages. These days, I’ve learned to make it at home.

Ingredients:

  • 1 cup sour, aged kimchi with juice
  • 1 tablespoon avocado oil
  • 6 green onions, cut into 1-inch segments, green and white sections separated
  • 1 tablespoon minced garlic
  • 2 teaspoons gochujang
  • 1 tablespoon soy sauce
  • 3 teaspoons gochugaru
  • 1 quart dashi
  • 1 1/2 pounds soft tofu
  • 1 egg per serving (4, depending on serving size)
  • Cooked rice, for serving
  1. Drain the kimchi in a strainer set over a small bowl, squeezing to remove liquid. Roughly chop the kimchi and reserve the kimchi and juice seperately.
  2. Heat the oil in a heavy saucepan (or similar) over medium-high heat. Add the whites of the green onions, garlic, and chopped kimchi. Cook, stirring constantly, until fragrant, about 1 minute.
  3. Add the kimchi juice, gochujang, and soy sauce. Cook until the vegetables are coated in an even layer of sauce. Add the gochugaru and dashi, bring to a simmer and cook about 10 to 15 minutes. (Optional step: add a handful of cubed daikon radish, enoki mushrooms, or beech mushrooms before simmering at this stage. You could also add a handful of shellfish in the last few minutes of cooking.)
  4. Add the tofu and green tops of the green onions, stir gently, and heat until boiling. Break the eggs directly into the simmering broth. Stir the egg in to make a richer soup, or let them loosely poach int the broth. Serve with rice.