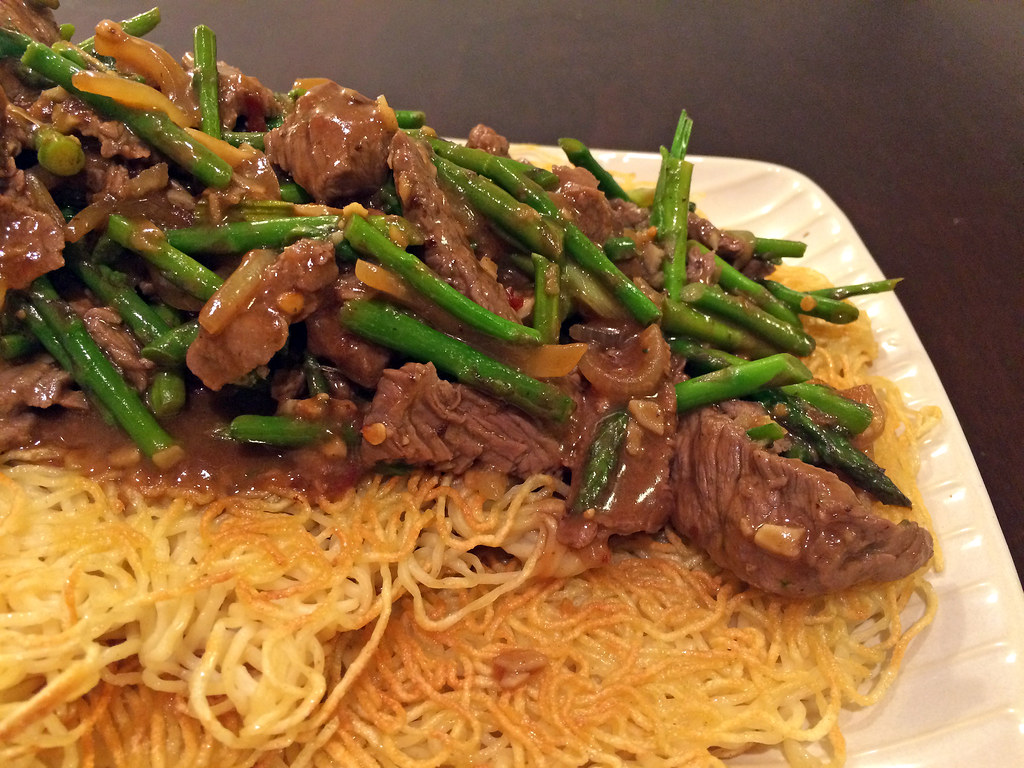
Japchae

Posted on

Japchae was the first Korean dish I tasted when I first tried the cuisine years ago as a teenager. It became one of my favorites but I rarely order it at a restaurant anymore because I’ve learned to cook it at home.

These results are restaurant quality and totally worth the payoff. Don’t substitute these sweet potato noodles — they’re worth seeking out for their chewy, slippery texture that soaks up all the flavor. Best of all, japchae reheats well and tastes just as good the next day.

Ingredients:

  • 3 tablespoons avocado oil
  • 1 cup julienned carrots
  • Salt and pepper to taste
  • 2 cups thinly sliced onions
  • 1 cup julienned red bell pepper
  • 1 cup julienned button mushrooms
  • 1 cup julienned filet mignon
  • 1 clove garlic, minced
  • 1/2 cup soy sauce
  • 1/3 cup sugar
  • 1 pound dried dangmyeon (Korean sweet potato starch noodles), cooked according to package directions
  • 2 tablespoons sesame oil
  • 2 tablespoons thinly sliced green onions, for garnish
  • 1 tablespoons toasted sesame seeds, for garnish

Directions:

  1. Heat 1 tablespoon oil in a large skillet over medium-high heat. Add carrots, season with salt and pepper, and cook, stirring, until half-tender, about 3 minutes. Transfer to a large bowl. Repeat with 1 tablespoon oil, onions, peppers, and mushrooms and add to bowl.
  2. Wipe skillet clean; heat remaining oil. Add steak and garlic and cook until browned, about 4 minutes. Add soy sauce and sugar and cook until sugar dissolves. Pour over vegetables in a bowl, add noodles and sesame oil, and toss. Garnish with green onions and sesame seeds.

Sushi rolls

Posted on

I’ve just returned from a trip to Tokyo and jet lag aside, it was everything my sushi-laden dreams are made of. I’m no early riser, but I even had sushi for breakfast one morning at Tsukiji fish market. The sushi was as good as I remembered it from my last trip a few years ago, and I’ve been craving it at home since I returned.

Thankfully, good sushi is within reach at home. For me, the toughest part is making the vinegared rice. I haven’t mastered it yet but I’ll keep trying until I get it right. It’s a great excuse to eat more sushi.

Homemade sushi

Homemade sushi

Ingredients:

1 1/2 cups sushi rice
1 2/3 cups water
1 4-inch piece of kombu seaweed
1/4 cup rice vinegar
2 tablespoons sugar
1/2 teaspoon salt
10 to 15 toasted nori seaweed sheets
any assortment of the following filling ingredients: sliced sashimi-grade tuna, sliced sashimi-grade salmon, salmon roe, sea urchin, crab, barbecued eel, egg omelet, shiso leaves, takuan pickled daikon radish, sesame seeds, sliced cucumber, sliced avocado, green onions, soy-simmered shiitake mushrooms, umeboshi plums, soy-simmered kampyo gourd strips, cooked spinach

1. Make the vinegared rice: soak the kombu seaweed in the water for about one hour to make the stock. Wash the rice 30 minutes prior to cooking and drain on a sieve. Put the vinegar, sugar, and salt in a small pot and heat slightly until dissolved. This completes the vinegar dressing. Place the rice and stock into a rice cooker and cook according to cooker instructions. Transfer the rice to a large bowl and sprinkle with the vinegar dressing. Using a flat wooden spoon, toss the rice with horizontal cutting strokes while cooling the rice with a hand-fan. When tossing is completed, cover the rice with a clean cloth moistened with water.

2. Place a nori seaweed sheet on a maki-su bamboo mat. Put the vinegared rice lightly on the nori sheet and spread over the sheet, leaving 3/4-inch at the top and bottom uncovered.

3. Place filling ingredients of your choice horizontally on top of the rice.

4. Lift the edges of both the bamboo mat and nori sheet nearest you and bring over to meet the far edge of the sheet.

5. Gently but firmly press the bamboo mat around the roll to shape it. Push both ends of the rolls towards the center firmly a few times using a cloth or plastic wrap.

6. Cut in sixths or eighths crosswise. Clean the knife with water between cuttings. Serve with soy sauce, wasabi, and pickled ginger.

Adas Polo (Iranian Rice and Lentils)

Posted on

Adas polo is comfort food. Simple to cook and customizable to taste, nearly every Iranian kid grew up with this lentil and rice dish. Like your adas polo sweet? Top with a sprinkling of fried raisins. Prefer it savory? Add extra fried onions. Craving a hit of tartness? Eat with a dollop of Middle Eastern yogurt.

Adas polo

This recipe comes courtesy of my mom, who always made me extra tahdig (the crispy rice at the bottom of the pot) to go with my adas polo. Now that’s love.

Ingredients:

3 cups basmati rice
1 onion, peeled and thinly sliced
8 tablespoons oil
1 1/2 tablespoons salt
3 1/2 cups water
2 cups lentils
1/2 cup raisins
Iranian or Greek yogurt, to serve

1. Clean and wash 3 cups of rice 3 times in cold water.

2. In an electric rice cooker, combine 3 1/2 cups water, washed and drained rice, 1 tablespoon salt, and 4 tablespoons oil. Start the rice cooker. Cover and let cook for 15 minutes.

3. In the meantime, clean and wash lentils and boil in a pot of water and 1/2 teaspoon salt for 15 minutes over high heat. Drain.

4. Hollow out the middle of the rice mound and add the lentils. Cover and continue cooking for 60 minutes longer, then unplug cooker and let stand for 10 minutes without uncovering it.

5. Meanwhile, in a skillet, brown the onion in remaining 4 tablespoons oil. Using a slotted spoon, remove onions and place on a serving plate. Reserve oil in skillet.

6. Reheat skillet with oil and brown raisins until slightly plump, about 4 minutes. Using a slotted spoon, remove raisins and place on another serving plate.

7. Remove rice cooker lid and place a large serving dish on top of the rice cooker mold. Grasp them together firmly and turn pot upside down to unmold tahdig and rice onto the dish. Cut into wedges and serve with onions, raisins, and yogurt.

Linguine with Clams and Bagna Cauda Butter

Posted on

What’s better than linguine with clams? Why, linguine with clams doused in a buttery, garlicy sauce, of course. Adapted from a Michael Chiarello recipe, this dish is a little bit Italian country and a little bit wine country. Most importantly, it’s entirely delicious.

Linguine with clams and bagna cauda butter

Ingredients:

1 pound dried linguine
6 tablespoons olive oil
2 tablespoons garlic
2 tablespoons chopped anchovies
3/4 stick butter
sea salt
4 pounds clams, scrubbed
1 1/2 cups dry white wine
3/4 cup coarsely chopped fresh Italian parsley

1. Heat 4 tablespoons olive oil in a small saucepan over low heat. When the oil just begins to warm, add the garlic and anchovies and cook slowly, stirring, until the garlic becomes light brown and the anchovies dissolve, about 10 minutes. Remove from heat and let cool completely.

2. Process the butter in a food processor until smooth and creamy. Add the cooled garlic-anchovy mixture and a pinch of salt. Process until well blended. Transfer to a bowl and stir in 2 tablespoons of the parsley, reserving the rest. Set bagna cauda butter mixture aside.

3. Bring a large pot of salted water to a boil over high heat. Add the pasta.

4. While the pasta cooks, prepare the clams. Heat a large pot over high heat. When very hot, add the olive oil, then add the clams. When the clams first begin to open, add the wine and bring to a boil. Boil for a couple of minutes to drive off the alcohol, then cover and cook until the clams open, about 5 minutes. Discard any clams that do not open.

5. Drain the pasta when it is al dente and transfer it to the pot with the clams. Cook over moderate heat for about 1 minute so the pasta absorbs some of the sauce. Turn off the heat, add the butter and reserved parsley and toss until the butter melts. Serve immediately.

Kimchi Fried Rice

Posted on

I guess kimchi fried rice has officially arrived since I noticed last week that Trader Joe’s now sells it, prepared and frozen. But why?! I thought to myself. Kimchi fried rice is so easy to cook!

Kimchi is one of my favorite foods (at the moment I have three jars sitting in the fridge), and this is one of my go-to dinners. If you already have day old rice, putting this dish together takes only minutes. There are endless variations, but don’t substitute the butter. A little goes a long way here. Lastly, use overripe kimchi. If you have a jar that’s at least a couple of weeks old, the flavor will be perfect for fried rice.

Kimchi fried rice

Ingredients

1 cup overripe kimchi, cut into bite size pieces
2 cups day-old rice, chilled
2 tablespoons cooking oil
1 tablespoon butter
1/2 tablespoon gochujang, or Korean red pepper paste
1 teaspoon soy sauce
1 T sesame oil
1/2 green onion, thinly sliced
2 eggs
1/2 teaspoon shredded nori seaweed, for garnish

1. Heat a frying pan or wok on medium heat and add butter. Add the kimchi and fry for 5 minutes, until it is slightly browned. Add gochujang and stir. Remove kimchi from pan and set aside.

2. Add 1 tablespoon cooking oil to pan and fry 1 egg, stirring to break up into bite-sized pieces until cooked through, about 2 minutes. Add kimchi mixture back to pan.

3. Add the rice to pan and mix thoroughly. Add soy sauce and sesame oil and mix again. Turn off heat and the rice mixture aside.

4. Heat remaining tablespoon of oil in a small frying pan over medium heat and crack remaining egg in pan. Cover the pan and cook until the egg white is solid, about one minute.

5. To serve, put the rice mixture in a serving bowl, and top with the fried egg and shredded nori.