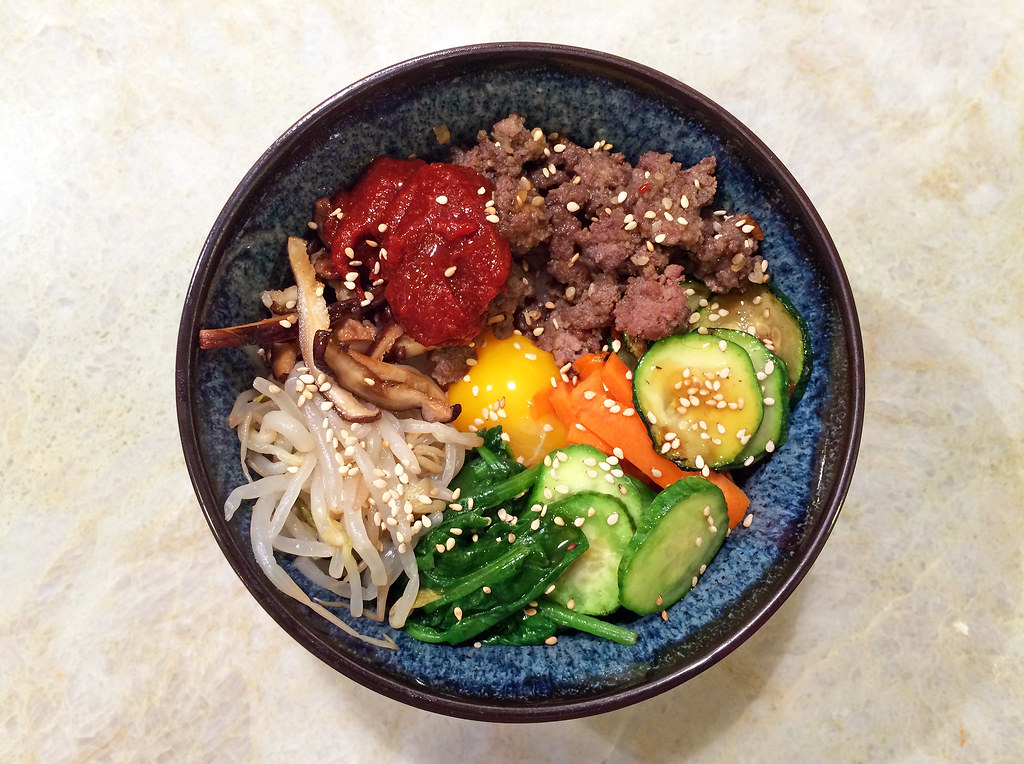
Adas Polo (Iranian Rice and Lentils)

Posted on

Adas polo is comfort food. Simple to cook and customizable to taste, nearly every Iranian kid grew up with this lentil and rice dish. Like your adas polo sweet? Top with a sprinkling of fried raisins. Prefer it savory? Add extra fried onions. Craving a hit of tartness? Eat with a dollop of Middle Eastern yogurt.

Adas polo

This recipe comes courtesy of my mom, who always made me extra tahdig (the crispy rice at the bottom of the pot) to go with my adas polo. Now that’s love.

Ingredients:

3 cups basmati rice
1 onion, peeled and thinly sliced
8 tablespoons oil
1 1/2 tablespoons salt
3 1/2 cups water
2 cups lentils
1/2 cup raisins
Iranian or Greek yogurt, to serve

1. Clean and wash 3 cups of rice 3 times in cold water.

2. In an electric rice cooker, combine 3 1/2 cups water, washed and drained rice, 1 tablespoon salt, and 4 tablespoons oil. Start the rice cooker. Cover and let cook for 15 minutes.

3. In the meantime, clean and wash lentils and boil in a pot of water and 1/2 teaspoon salt for 15 minutes over high heat. Drain.

4. Hollow out the middle of the rice mound and add the lentils. Cover and continue cooking for 60 minutes longer, then unplug cooker and let stand for 10 minutes without uncovering it.

5. Meanwhile, in a skillet, brown the onion in remaining 4 tablespoons oil. Using a slotted spoon, remove onions and place on a serving plate. Reserve oil in skillet.

6. Reheat skillet with oil and brown raisins until slightly plump, about 4 minutes. Using a slotted spoon, remove raisins and place on another serving plate.

7. Remove rice cooker lid and place a large serving dish on top of the rice cooker mold. Grasp them together firmly and turn pot upside down to unmold tahdig and rice onto the dish. Cut into wedges and serve with onions, raisins, and yogurt.

Linguine with Clams and Bagna Cauda Butter

Posted on

What’s better than linguine with clams? Why, linguine with clams doused in a buttery, garlicy sauce, of course. Adapted from a Michael Chiarello recipe, this dish is a little bit Italian country and a little bit wine country. Most importantly, it’s entirely delicious.

Linguine with clams and bagna cauda butter

Ingredients:

1 pound dried linguine
6 tablespoons olive oil
2 tablespoons garlic
2 tablespoons chopped anchovies
3/4 stick butter
sea salt
4 pounds clams, scrubbed
1 1/2 cups dry white wine
3/4 cup coarsely chopped fresh Italian parsley

1. Heat 4 tablespoons olive oil in a small saucepan over low heat. When the oil just begins to warm, add the garlic and anchovies and cook slowly, stirring, until the garlic becomes light brown and the anchovies dissolve, about 10 minutes. Remove from heat and let cool completely.

2. Process the butter in a food processor until smooth and creamy. Add the cooled garlic-anchovy mixture and a pinch of salt. Process until well blended. Transfer to a bowl and stir in 2 tablespoons of the parsley, reserving the rest. Set bagna cauda butter mixture aside.

3. Bring a large pot of salted water to a boil over high heat. Add the pasta.

4. While the pasta cooks, prepare the clams. Heat a large pot over high heat. When very hot, add the olive oil, then add the clams. When the clams first begin to open, add the wine and bring to a boil. Boil for a couple of minutes to drive off the alcohol, then cover and cook until the clams open, about 5 minutes. Discard any clams that do not open.

5. Drain the pasta when it is al dente and transfer it to the pot with the clams. Cook over moderate heat for about 1 minute so the pasta absorbs some of the sauce. Turn off the heat, add the butter and reserved parsley and toss until the butter melts. Serve immediately.

Kimchi Fried Rice

Posted on

I guess kimchi fried rice has officially arrived since I noticed last week that Trader Joe’s now sells it, prepared and frozen. But why?! I thought to myself. Kimchi fried rice is so easy to cook!

Kimchi is one of my favorite foods (at the moment I have three jars sitting in the fridge), and this is one of my go-to dinners. If you already have day old rice, putting this dish together takes only minutes. There are endless variations, but don’t substitute the butter. A little goes a long way here. Lastly, use overripe kimchi. If you have a jar that’s at least a couple of weeks old, the flavor will be perfect for fried rice.

Kimchi fried rice

Ingredients

1 cup overripe kimchi, cut into bite size pieces
2 cups day-old rice, chilled
2 tablespoons cooking oil
1 tablespoon butter
1/2 tablespoon gochujang, or Korean red pepper paste
1 teaspoon soy sauce
1 T sesame oil
1/2 green onion, thinly sliced
2 eggs
1/2 teaspoon shredded nori seaweed, for garnish

1. Heat a frying pan or wok on medium heat and add butter. Add the kimchi and fry for 5 minutes, until it is slightly browned. Add gochujang and stir. Remove kimchi from pan and set aside.

2. Add 1 tablespoon cooking oil to pan and fry 1 egg, stirring to break up into bite-sized pieces until cooked through, about 2 minutes. Add kimchi mixture back to pan.

3. Add the rice to pan and mix thoroughly. Add soy sauce and sesame oil and mix again. Turn off heat and the rice mixture aside.

4. Heat remaining tablespoon of oil in a small frying pan over medium heat and crack remaining egg in pan. Cover the pan and cook until the egg white is solid, about one minute.

5. To serve, put the rice mixture in a serving bowl, and top with the fried egg and shredded nori.

Okonomiyaki

Posted on

The first time I tried okonomiyaki, I had just moved in with my new roommates for college, two of whom were from Japan: Sanae from Tokyo and Sanae from Osaka. Throughout the year, I was fortunate to learn to cook all kinds of regional dishes with them, many of which can be hard to find in restaurants.

Okonomiyaki was the first homestyle Japanese dish that they taught me, and to this day, it remains one of my favorites. Loosely translated as “as you like it,” okonomiyaki is a savory pancake consisting of varying filling ingredients but the flour, egg, cabbage, and dashi base remain consistent.

Okonomiyaki, part one

My version of okonomiyaki is pretty standard, albeit without the mountain yam that can be so hard to track down. When I was in Japan two years ago, I tried a delicious rendition in Kyoto that had a fried noodle base, as well as another version with melted cheese and dried anchovies, so the possibilities are endless. The ingredient list might be daunting, but it’s worth the search – and oh, don’t forget the giant octopus tentacle.

Okonomiyaki, part two

Ingredients:

1/2 cup all-purpose flour
2/3 cup dashi stock
1 egg
1 cup cabbage, shredded
2 green onions, thinly sliced
benishoga red pickled ginger, chopped (not to be confused with gari pickled ginger, which is commonly served alongside sushi)
3 inches cooked octopus, finely chopped
1 handful dried bonito flakes
1/2 teaspoon dried nori flakes
okonomi sauce (available in Japanese and well-stocked Asian grocers)
Japanese-style mayonnaise (I recommend Kewpie brand)
vegetable oil

1. Place the flour and dashi stock in a bowl, and mix well. Add the cabbage, onion, benishoga ginger, octopus, and egg to the bowl, and mix well.

2. Heat a nonstick frying pan over medium-high heat and add one tablespoon vegetable oil. Pour 1/3 cup of the batter mixture into the pan, and sprinkle a few dried bonito flakes on top. Cook for about 3 minutes.

3. Carefully flip the pancake over, and cook for about 4 minutes. Reverse again, and cook for another 4 minutes. Transfer the pancake to a serving plate.

4. Spread okonomi sauce and mayonnaise on top of the pancake, and sprinkle with dried nori and bonito flakes.

5. Repeat steps 2 to 4 until batter is finished.

Tofu Pad Thai

Posted on

I’ve struggled with homemade pad Thai. After trying to recreate it at home several times over the years, I sort of gave up and assumed I’d never be able to cook restaurant-style pad Thai at home.

That is, until I tried this recipe, adapted from the now-defunct Gourmet magazine. I didn’t have high hopes – after all, where was the shrimp? But despite the lack of meat, this rendition is full of flavor, texture, and best of all, it actually tastes like classic pad Thai.

Tamarind is essential to this dish so I don’t recommend substituting with similar flavors. And don’t be put off by the large volume of shallots – the first time I made this dish I only wished I’d fried up more crispy slices.

Tofu Pad Thai

Ingredients:

12 ounces dried flat rice noodles (1/4 inch wide)
3 tablespoons tamarind (from a pliable block)
1 cup boiling-hot water
1/2 cup soy sauce
1/4 cup packed light brown sugar
1 1/2 tablespoons chili garlic sauce
1 bunch green onions
4 shallots
1 16-ounce package firm tofu
1 cup vegetable oil
6 eggs
4 garlic cloves, finely chopped
2 cups bean sprouts
1/2 cup roasted peanuts, coarsely chopped

1. Soak noodles in a large bowl of warm water until softened, 20 minutes. Drain in a colander and set aside.

2. Meanwhile, make sauce by soaking tamarind pulp in boiling-hot water in a small bowl, stirring occasionally, until softened, about 5 minutes. Force mixture through a sieve into a bowl, discarding seeds and fibers. Add soy sauce, brown sugar, and chili garlic sauce, stirring until sugar has dissolved.

3. Cut green onions into 2-inch pieces. Cut shallots crosswise into very thin slices. Rinse tofu, then cut into 1-inch cubes and pat dry.

4. Heat oil in wok over medium heat until hot, then fry half of shallots over medium-low heat, stirring frequently, until golden-brown, 8 to 12 minutes. Strain mixture through a fine-mesh sieve into a bowl. Reserve shallot oil and spread fried shallots on paper towels. (Shallots will crisp as they cool.) Wipe wok clean.

5. Reheat shallot oil in wok over high heat until hot. Fry tofu in 1 layer, gently turning occasionally, until golden, 5 to 8 minutes. Transfer tofu to paper towels using a slotted spoon. Pour off frying oil and reserve.

6. Lightly beat eggs with 1/4 teaspoon salt. Heat 2 tablespoons shallot oil in wok over high heat until it shimmers. Add eggs and swirl to coat side of wok, then cook, stirring gently with a spatula, until cooked through. Break into chunks with spatula and transfer to a plate.

7. Heat wok over high heat, pour in 4 tablespoons shallot oil, then swirl to coat side of wok. Stir-fry scallions, garlic, and remaining uncooked shallots until softened, about 1 minute.

8. Add noodles and stir-fry over medium heat for 3 minutes. Add tofu, bean sprouts, and 1 1/2 cups sauce and simmer, turning noodles over to absorb sauce evenly, until noodles are tender, about 3 minutes.

9. Stir in additional sauce if desired, then stir in eggs and transfer to a large shallow serving dish. Sprinkle pad Thai with peanuts and fried shallots and serve.