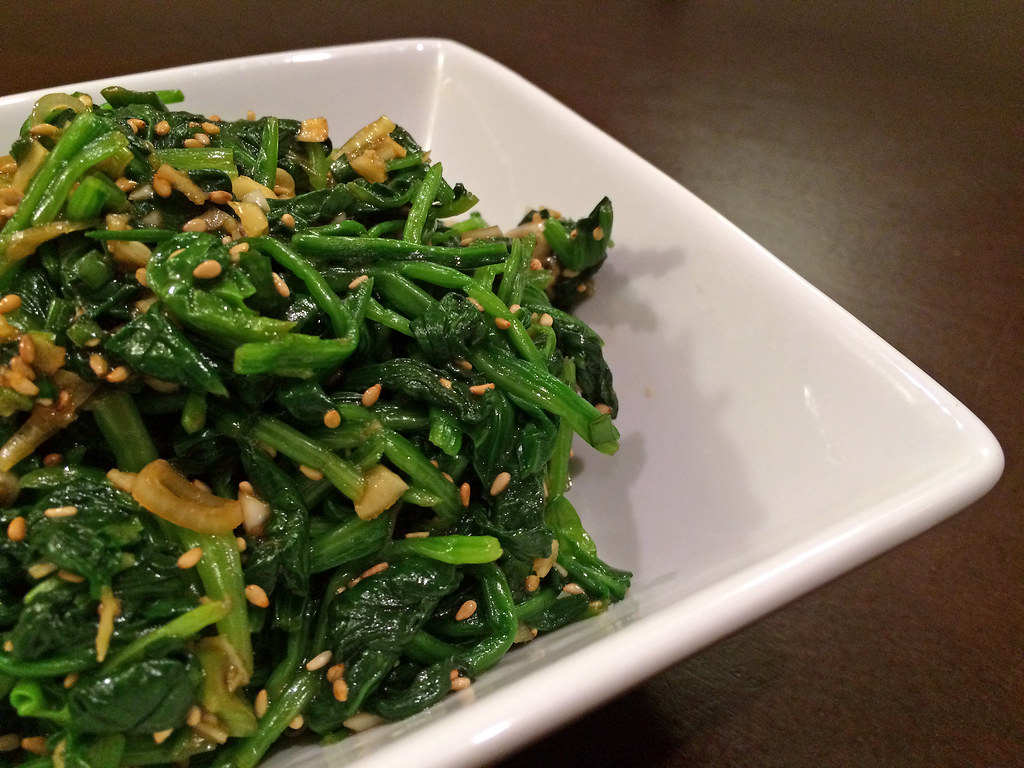
Sri Lankan Roasted Curry Powder

Posted on

I’ll never buy bottled curry powder again.

Spices for Sri Lankan roasted curry powder

Sri Lankan cuisine is under the radar in the U.S. and it’s a shame. I’ve been lucky to taste so many Sri Lankan dishes with Nishan’s family and these days, I’m learning to cook it myself. It’s fiery, vibrant, and the flavors are an amalgamation of Sri Lanka’s history. The rice and curry spreads vary with Tamil dishes, Sinhalese dishes, Muslim dishes, Dutch and British-influenced dishes, and rice and coconut factor into nearly every meal. I could go on forever, but Serious Eats has already written a terrific primer on the cuisine.

The base to many of the curries I’ve been cooking is this roasted curry powder. In practice, it’s usually supplemented with large doses of chili powder and fresh chiles. This curry powder should keep indefinitely in the fridge, but I wouldn’t know. A batch rarely lasts long in our household.

Ingredients:

1 tablespoon uncooked basmati rice
4 tablespoons coriander seeds
2 tablespoons cumin seeds
2 tablespoons fennel seeds
1 piece cinnamon stick
1/2 teaspoon fenugreek seeds
1 teaspoon black peppercorns
1 teaspoon black mustard seeds
1 teaspoon turmeric powder
5 cardamom pods, shelled
5 cloves
2 springs curry leaves

1. Toast each ingredient on a saucepan separately over medium heat, stirring often, until fragrant and lightly browned. Remove from heat, cool, and grind in a coffee grinder. Store in a glass jar in the refrigerator.

Homemade Almond Milk

Posted on

This almond milk is incredibly easy to make, contains no sugar, and is absolutely delicious. I first concocted this rich refresher last year when I was trying to return to cleaner eating habits and ended up enjoying this by itself as a dessert.

With only four ingredients, this almond milk is a breeze — and much healthier than the additive laced versions you’ll find in the grocery store. Make sure you use raw almonds (instead of roasted) to achieve the right flavor.

Homemade almond milk

Ingredients:

1 cup raw almonds
5 cups filtered water, plus more for soaking
4 plump Medjool dates, pitted
1/4 teaspoon cinnamon
sea salt

1. In a bowl, cover the almonds with water and let stand overnight in the refrigerator.

2. Drain and rinse the almonds; transfer to a blender. Add the dates, cinnamon, 5 cups of water and a pinch of salt to the blender and puree on high speed until very smooth, about 2 minutes. Pour the nut milk through a cheesecloth-lined fine sieve set over a bowl and let drain for 30 minutes. Using a spatula, press on the solids to extract any remaining milk; discard the solids. Transfer the nut milk to an covered container and refrigerate until chilled, about 30 minutes. Stir or shake before serving.

Chicken Chow Fun

Posted on

I’m trying to cut down on pasta lately, but I’d like to think that this dish doesn’t count because it uses rice noodles as opposed to flour-based noodles. Rice doesn’t count, right? At least that’s what the Iranian in me says.

Carb delirium aside, this chicken chow fun dish is a much healthier (and delicious!) version of the restaurant classic. The meat is lean, the oil is minimal, and the vegetables are plentiful.

Chicken chow fun

Ingredients:

1 pound fresh or dried flat rice noodles, about 1/2 inch wide
3 tablespoons soy sauce
1 teaspoon Chinese rice wine
1 tablespoon minced garlic
1 teaspoon cornstarch
1/8 teaspoon white pepper
1/2 pound boneless, skinless chicken, thinly sliced
1 teaspoon chili garlic sauce
1/2 teaspoon sugar
1 tablespoon vegetable oil
1/2 yellow onion, thinly sliced
3 green onions, trimmed and cut into 1-inch pieces
1 teaspoon minced ginger
1 cup bean sprouts
1/4 cup roasted peanuts

1. If using dried rice noodles, pour enough warm water over them in a large bowl to cover completely. Let soak until softened, about 30 minutes. Drain thoroughly. If using fresh rice noodles, run under warm water and separate strands.

2. Marinate the chicken: Stir 1 tablespoon of the soy sauce, rice wine, garlic, cornstarch, and pepper together in a bowl until the cornstarch is dissolved. Toss the chicken gently in the marinade until coated. Let stand for 20 minutes.

3. Prepare the seasonings: stir the remaining soy sauce, chili garlic sauce, and sugar together in a bowl until the sugar is dissolved.

4. Heat a wok over high heat until hot. Add oil and swirl to coat the sides. Add the noodles and stir-fry until the noodles are lightly browned along the edges, about 2 minutes. Place the noodles onto a plate and set aside.

5. Add the chicken to the wok and stir-fry until no longer pink, about 3 minutes. Add both onions and the ginger and stir-fry until fragrant, about 2 minutes. Slide the noodles into the wok, scatter the bean sprouts over them, and pour in the seasonings. Toss until the mixture is heated through and the chicken is coated evenly with the seasonings, about 4 minutes.

6. Stir in the peanuts, place the contents of the wok onto a serving plate, and serve.

Blistered Shishito Peppers with Miso

Posted on

Sometimes I don’t have time to cook, but the desire to create something delicious wins so I end up turning on the stove and thinking to myself, okay, I have twenty minutes. Let’s do this.

Adapted from a simple Food and Wine recipe, I made these salty, earthy peppers one afternoon when I wanted to bring something to a family picnic but was short on time. Fresh peppers aside, you probably already have most of these ingredients in your pantry. These little bites are perfect with a cold drink or even as a side dish.

Blistered shishito peppers with miso

Ingredients:

1 1/2 tablespoons white miso
1 1/2 tablespoons sake
1 tablespoon canola oil
1 small dried red chile
3/4 pound shishito peppers
1 tablespoon minced peeled fresh ginger

1. In a small bowl, stir the miso and sake until smooth.

2. In a large skillet, heat the oil with the chile until shimmering. Add the shishitos and ginger and cook over high heat, tossing, until tender and blistered in spots, 2 to 3 minutes. Remove from the heat, add the miso sake mixture and toss well. Transfer to a plate and serve.

Khiar Shoor (Pickled Cucumbers)

Posted on

Khiar shoor literally translates from Persian to English as “salty cucumbers,” but it is so much more than that. Shoor are a category of Iranian pickled vegetables, be they cucumbers or cauliflower or carrots or nearly any other vegetable. There’s also torshi, but that’s a whole other classification of pickled vegetables that we’ll save for another post.

Every summer while I was growing up, my mom and all the Iranian aunties would gather in someone’s home and spend the day peeling vegetables and peppers and onions, making the next year’s batch of shoor and torshi. The air would be ripe with the smell of vinegar and garlic and the kids would be enlisted to help. The shoor would be ready to eat a few weeks later; the torshi would need to wait months, sometimes even years.

Nowadays you can buy shoor or torshi at any Middle Eastern market but nothing comes close to the homemade version. I made this version when I found myself with too many Armenian cucumbers from my parents’ garden. Once ready, these cucumbers go wonderfully with sandwiches or kotlet.

Pickled Armenian cucumbers

Ingredients:

2 red or green chili peppers
2 pounds Persian or Armenian cucumbers
5 cloves garlic, peeled
7 sprigs tarragon
4 bay leaves
1 tablespoon peppercorns
1/2 teaspoon sugar
1/2 cup white vinegar
kosher salt

1. Wash, clean and drain the vegetables and herbs. Sterilize canning jars, drain and dry thoroughly.

2. Fill each jar almost to the top with cucumbers, garlic, tarragon, and bay leaves.

3. Bring 6 tablespoons salt, 12 cups water, peppercorns, sugar, vinegar, and chili peppers to a boil. Remove from heat and fill each jar within 1/2 inch of the top with this hot liquid. Let cool and seal jars. Store the jars in the refrigerator for at least 10 days before using.