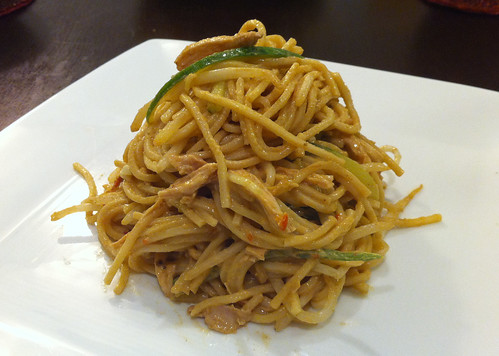
This is one of the earliest recipes I learned to cook and more than fifteen years later, it still remains one of my favorites. This spicy, peanuty noodle salad is easy to make and is perfect for picnics or lunches on the go. It’s worth seeking out Sichuan peppercorns for this dish, as they add a unique, tingly spice that can’t be replicated.
Ingredients:
1 package (about 12 ounces) fresh Chinese egg noodles
4 teaspoons sesame oil
1 Persian cucumber, julienned
1/4 pound fresh mung bean sprouts
2 cups cooked shredded chicken breast
1/3 cup chicken broth
1/3 cup peanut butter
2 tablespoons soy sauce
2 tablespoons rice vinegar
1 1/2 teaspoons chili garlic sauce
1/2 teaspoon sugar
1/2 teaspoon ground, toasted Sichuan peppercorns
1. Cook noodles in a pot of boiling water according to package directions. Drain, rinse with cold water, and drain again. Place noodles in a bowl and add two teaspoons of sesame oil and toss to coat. Cover and refrigerate until chilled.
2. In the meantime, prepare the dressing: in another bowl, combine broth, peanut butter, soy sauce, rice vinegar, remaining sesame oil, chili garlic sauce, sugar, and whisk until blended.
3. Add cucumber, mung bean sprouts, chicken, and dressing over noodles and mix well. Serve cold.
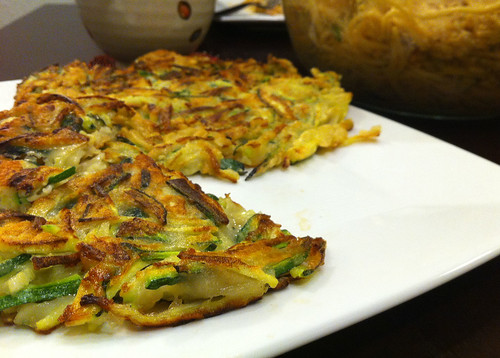
If you’ve been reading my blog for more than, say, five minutes, then you know I love Korean food. When my parents’ garden produced a giant bounty of zucchini last year, I turned to my favorite Korean food blog, maangchi.com, for inspiration. It was from there that I adapted a recipe for hobakjeon, or zucchini pancakes, served with a delicious dipping sauce. So easy and so delicious, these pancakes have become one of my favorite recipes ever since.
Ingredients:
2 zucchini, julienned
1/2 cup flour
1/2 teaspoon salt
1/2 cup water
2 tablespoons vegetable oil (or more as needed)
1 tablespoon sesame oil (or more as needed)
2 tablespoon soy sauce
1 tablespoon rice vinegar
1/2 clove garlic, minced
1 chili pepper, sliced
1. Combine zucchini, flour, salt, and water in a bowl and mix well.
2. Heat the 2 tablespoons of vegetable oil in a frying pan on medium-high heat and place 1 cup of the batter in the pan, spreading evenly and thinly to make a large pancake. After two minutes, add 1 tablespoon of the sesame oil on the pan, along the edge of the pancake. Tilt and shake the pan so that the sesame oil spreads underneath the pancake. Cook another couple of minutes until the bottom turns light golden brown and crispy.
3. Carefully flip the pancake with a spatula and add another tablespoon of vegetable oil, if needed. Cook for another three to four minutes, until crispy. Transfer the pancake to a large serving plate and serve with dipping sauce.
4. To make the dipping sauce: In a small bowl mix the soy sauce, vinegar, garlic, and chili pepper. Serve alongside the warm pancake.
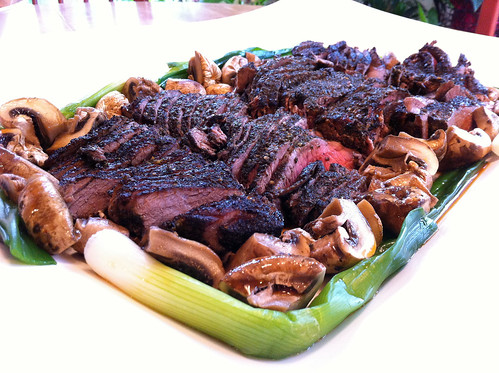
I first made this dish several years ago, adapted from a recipe in the now defunct Gourmet Magazine. Since then, it’s become my most-requested meat entree, and even though it takes a some work to pull off, it’s worth it. Make sure to serve this with plenty of steamed rice to soak up the sauce.
Ingredients:
2 bunches green onions
1/2 pound shiitake mushrooms, stems discarded
salt and pepper
1 pound sirloin steak
2 square sheets of nori seaweed, torn into small pieces
1 tablespoon sesame seeds
1 teaspoon crushed red pepper
1 1/2 tablespoons olive oil
2 tablespoons soy sauce
1 tablespoon mirin
1 teaspoon fresh lemon juice
1. Preheat the oven to 400 degrees. In a small saucepan of boiling water, blanch the green onions for 2 minutes. Drain and rinse under cold water. Set a rack on a baking sheet and arrange the shiitake mushroom caps on the rack, gill sides down. Season lightly with salt and pepper.
2. Season the steak with salt. In a food processor or spice grinder, coarsely grind the nori with the sesame seeds, red pepper and 1 teaspoon black pepper. Spread the nori mixture on a plate and dredge the steak in it.
3. In a medium skillet, heat 1 tablespoon of the olive oil until shimmering. Add the steak and cook over high heat until the nori is toasted, about 4 minutes per side. Place the steak over the mushrooms and roast for about 15 minutes, until the meat is medium rare. Transfer the steak to a cutting board and let rest for 10 minutes.
4. Meanwhile, quarter the mushroom caps. In a small bowl, whisk the soy sauce with the mirin, lemon juice and the remaining 1/2 tablespoon of olive oil.
5. Slice the steak 1/4 inch thick and arrange it on plates with the shiitake mushrooms and scallions. Drizzle the soy mixture over the steak and serve.
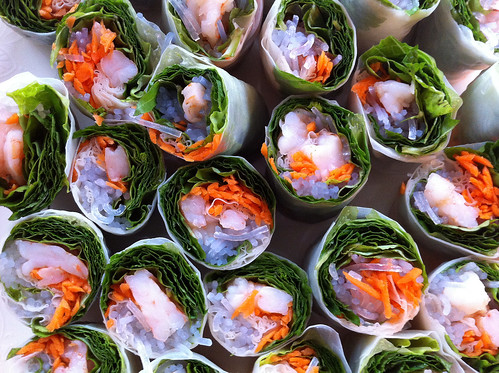
I make these light and healthy spring rolls all the time, especially when the weather begins to warm up. (Or when it never cools down, as is this case with this year’s endless Bay Area summer.)
Even though I usually make them with shrimp, you can substitute with shredded chicken, fresh crab, or any kind of protein. The herbs are interchangeable too: I prefer a mix of romaine lettuce, mint, and basil, but anything goes. Sometimes I substitute shredded carrots with cucumbers or avocado instead. You get the picture.
Don’t make these too ahead of time, as I’ve learned the hard way that refrigerating fresh spring rolls results in a stale wrapper. Don’t worry, though. These are so good you won’t have any left over.
Ingredients:
1/2 cup creamy peanut butter
1/4 cup chicken broth
2 tablespoons hoisin sauce
3 tablespoons soy sauce
1 tablespoon granulated sugar
2 teaspoons chile-garlic sauce
1 teaspoon toasted sesame oil
1 1/2 tablespoons rice vinegar
24 medium shrimp (about 1 pound), peeled (or shredded chicken)
4 ounces dried bean thread (glass) noodles
16 round rice paper wrappers
1 carrot, peeled and shredded
1 bunch mint leaves, removed from stems
1 bunch basil leaves, removed froms tems
1 Persian cucumber, peeled and julienned
1 bunch romaine lettuce, ribs removed
1. To make the peanut sauce, whisk the first 8 ingredients together in a medium bowl; set aside.
2. To make the spring rolls, bring a medium saucepan of water to a boil over high heat. Add the shrimp and cook until pink and opaque, about 2 minutes. Drain in a colander and run under cold water until cool. Pat the shrimp dry with paper towels and place on a cutting board. Holding your knife parallel to the cutting board, halve each shrimp horizontally. Set aside.
3. Bring 3 cups of water to a boil and pour over bean thread noodles in a heat-proof bowl and cover for 5 minutes. Drain and set aside.
4. Place a clean, damp kitchen towel on a work surface. Fill a medium frying pan or wide, shallow dish large enough to hold the rice paper wrappers with hot tap water. Working with 1 wrapper at a time, completely submerge the wrapper until it is soft and pliable, about 15 seconds. Remove the wrapper from the water and place it on the towel.
Working quickly, tear off a piece of lettuce that is roughly half the size of the wrapper and place in the center of the wrapper. Add 3 shrimp halves in a row, cut side up, just above the center of the wrapper, leaving about 1 inch of space on each side. Layer 1/4 cup of the noodles over the shrimp, followed by a spoon of carrot, a few mint leaves, and a few basil leaves. Place 2 of the cucumber sticks on either side of the noodle pile.
5. Fold the bottom and top halves of the rice paper wrapper over the filling. Holding the whole thing firmly in place, fold the sides of the wrapper in. Then, pressing firmly down to hold the folds in place, roll the entire wrapper horizontally up from the bottom to the top. Slice in half.
6. If not serving immediately, keep the summer rolls tightly covered with plastic wrap at room temperature for up to 2 hours. Serve with the peanut sauce for dipping.
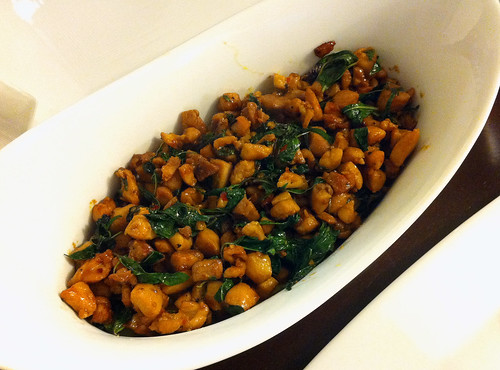
I first tasted gai pad gra pow this past spring (late pass, I know), when my friend Natasha offered me a bite of her dish at a Thai restaurant in San Francisco. I was hooked, and I had to learn how to cook it.
Since then, this basil-inflected chicken stir-fry has become one of my favorites. Spicy and full of protein, it pairs perfectly with a cooling cucumber salad and steamed rice.
Ingredients:
5 cloves garlic, minced
3 bird’s eye (Thai) chiles, stemmed and minced
1 1/2 pounds boneless, skinless chicken thighs, cleaned and chopped into bite-sized pieces
1 tablespoon fish sauce
1 teaspoon soy sauce
1 teaspoon sugar
1/4 teaspoon black pepper
1 cup Thai basil leaves
1. Place a wok over high heat. Add the oil, garlic, and chiles and stir-fry for 30 seconds, or until the garlic is slightly golden. Add the chicken and stir-fry for 5 minutes, or until the chicken has cooked throughout, using a spatula to press the meat against the hot wok.
2. Add the fish sauce, soy sauce, sugar, and pepper and stir-fry for 1 minute. Add the basil and stir-fry until wilted, about 1 minute, then turn out onto a serving dish. Serve warm.