Sometimes I don’t have time to cook, but the desire to create something delicious wins so I end up turning on the stove and thinking to myself, okay, I have twenty minutes. Let’s do this.
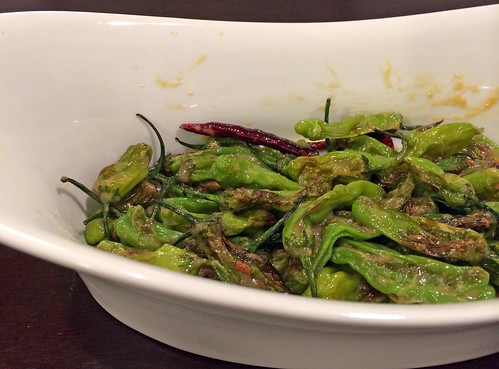
Adapted from a simple Food and Wine recipe, I made these salty, earthy peppers one afternoon when I wanted to bring something to a family picnic but was short on time. Fresh peppers aside, you probably already have most of these ingredients in your pantry. These little bites are perfect with a cold drink or even as a side dish.
Ingredients:
1 1/2 tablespoons white miso
1 1/2 tablespoons sake
1 tablespoon canola oil
1 small dried red chile
3/4 pound shishito peppers
1 tablespoon minced peeled fresh ginger
1. In a small bowl, stir the miso and sake until smooth.
2. In a large skillet, heat the oil with the chile until shimmering. Add the shishitos and ginger and cook over high heat, tossing, until tender and blistered in spots, 2 to 3 minutes. Remove from the heat, add the miso sake mixture and toss well. Transfer to a plate and serve.
I work near San Francisco’s Chinatown and every day is an uphill (literally and figuratively) battle to resist the delicious noodle dishes beckoning at every corner. My favorite are the bustling Hong Kong-style shops that line Chinatown’s alleyways, serving chewy egg noodles tossed with fresh vegetables and seafood.
This dish is an homage to those restaurants that I adore so much. It’s worth it to seek out garlic chives as they impart a uniquely herbaceous flavor, although a combination of regular chives and minced garlic can be substituted. I use scallops and squid here, but any shellfish will work just fine.
1. Bring a large pot of water to a boil. Add noodles and cook according to package directions. Drain, rinse with cold water, and drain again. Add 2 teaspoons sesame oil and toss to coat.
2. Cut off squid tentacles. Cut squid bodies in half lengthwise with a knife and score the inside diagonally in a cross-hatch pattern. Combine squid tentacles and bodies, scallops, cornstarch, and salt in a bowl. Stir to coat; let stand for 10 minutes. Combine chicken broth, soy sauce, oyster-flavored sauce, and remaining teaspoon sesame oil in another bowl to form sauce.
3. Soak dried mushrooms in warm water to cover until softened, about 20 minutes; drain. Discard stems and thinly slice caps.
4 Place a wok over medium-high heat until hot. Add vegetable oil, swirling to coat sides. Add mushrooms, ginger, garlic chives, and green onions; stir-fry for 3 minutes. Add scallops and squid; stir-fry for 3 minutes. Add sauce, stirring, until it boils and thickens. Toss in noodles, mix well, remove from heat, and serve.
I can’t shake the memory of the savory-sweet inari sushi I had on the train in Japan this past May.
Nishan and I were tired and hungry after a long day in Hakone, a sleepy town at the feet of Mount Fuji and best known for their onsen, or hot springs. We only had ten minutes left to catch the train back to Tokyo so I dashed into a shop and grabbed a small box of inari sushi. It was a welcome treat after a long day in the mountains and we inhaled it down to the last grain of rice on the return train. Each piece of sushi held a different savory and oh-so-slightly sweet filling atop the rice: furikake, tsukemono, shiitake mushrooms, and tamago.
I’ve since learned how to make these delicious parcels and they are much easier to produce than I initially thought. They are simple but filling and perfect for a picnic — or your next train ride.
1. Make the vinegared rice: soak the kombu seaweed in the water for about one hour to make the stock. Wash the rice 30 minutes prior to cooking and drain on a sieve. Put the vinegar, sugar, and salt in a small pot and heat slightly until dissolved. This completes the vinegar dressing. Place the rice and stock into a rice cooker and cook according to cooker instructions. Transfer the rice to a large bowl and sprinkle with the vinegar dressing. Using a flat wooden spoon, toss the rice with horizontal cutting strokes while cooling the rice with a hand-fan. When tossing is completed, cover the rice with a clean cloth moistened with water.
2. Mix 3/4 cup dashi stock, 1 tablespoon sugar, and 1 teaspoon mirin in a saucepan. Peel the carrot and cut into julienned strips. Add carrot to saucepan and simmer over a low heat until seasoned, about 5 minutes. Set aside.
3. Mix 3/4 cup dashi stock, 1 tablespoon sugar, 1 teaspoon mirin, and 1 tablespoon soy sauce in another saucepan. Soften the dried shiitake mushrooms in warm water and cut into 1/4 inch cubes. Add mushrooms to saucepan and simmer over a low heat until seasoned, about 10 minutes. Set aside.
4. Mix remaining 1 1/2 cups dashi stock, 3 tablespoons sugar, and sake in another saucepan. Place the abura-age tofu in the saucepan and bring to a boil. Lower to a simmer and cook for about 5 minutes. Add the remaining 3 tablespoons soy sauce to the abura-age simmering liquid, slightly with a lid and simmer until the liquid is mostly gone.
5. Add the sesame, carrot, and shiitake mushrooms to the vinagared rice and mix.
6. Squeed the abura-age lightly to remove moisture. Fill each abura-age pocket with vinagared rice. Adjust the shape and fold the opening. Serve room temperature.
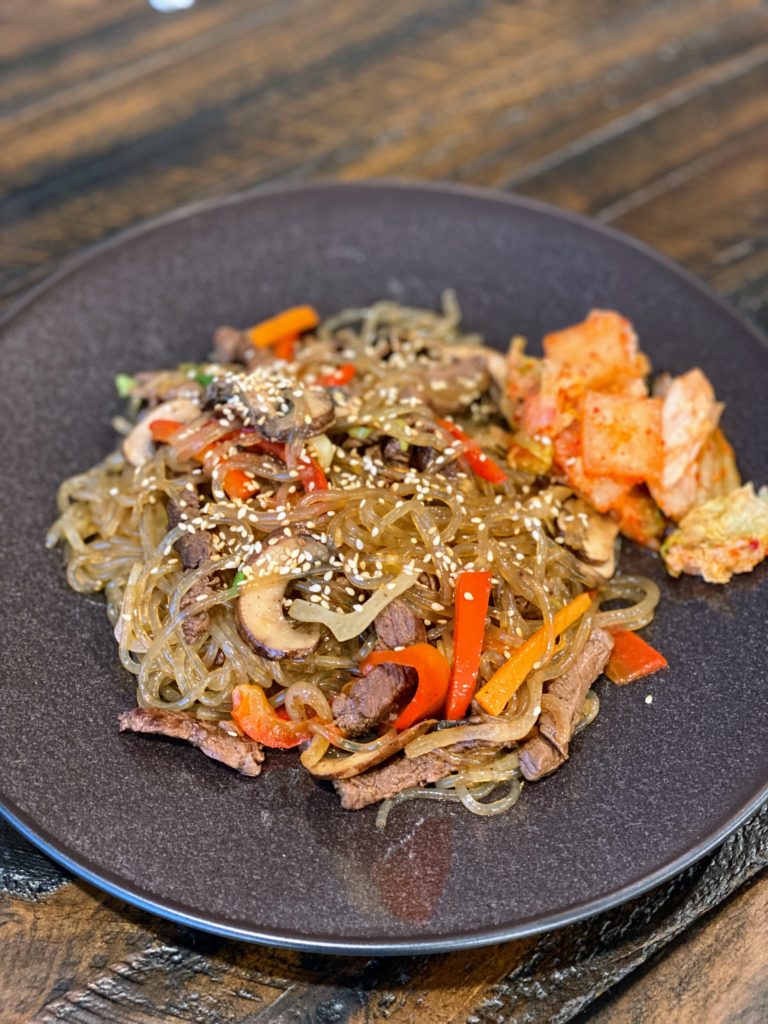
Japchae was the first Korean dish I tasted when I first tried the cuisine years ago as a teenager. It became one of my favorites but I rarely order it at a restaurant anymore because I’ve learned to cook it at home.
These results are restaurant quality and totally worth the payoff. Don’t substitute these sweet potato noodles — they’re worth seeking out for their chewy, slippery texture that soaks up all the flavor. Best of all, japchae reheats well and tastes just as good the next day.
Ingredients:
3 tablespoons avocado oil
1 cup julienned carrots
Salt and pepper to taste
2 cups thinly sliced onions
1 cup julienned red bell pepper
1 cup julienned button mushrooms
1 cup julienned filet mignon
1 clove garlic, minced
1/2 cup soy sauce
1/3 cup sugar
1 pound dried dangmyeon (Korean sweet potato starch noodles), cooked according to package directions
2 tablespoons sesame oil
2 tablespoons thinly sliced green onions, for garnish
1 tablespoons toasted sesame seeds, for garnish
Directions:
Heat 1 tablespoon oil in a large skillet over medium-high heat. Add carrots, season with salt and pepper, and cook, stirring, until half-tender, about 3 minutes. Transfer to a large bowl. Repeat with 1 tablespoon oil, onions, peppers, and mushrooms and add to bowl.
Wipe skillet clean; heat remaining oil. Add steak and garlic and cook until browned, about 4 minutes. Add soy sauce and sugar and cook until sugar dissolves. Pour over vegetables in a bowl, add noodles and sesame oil, and toss. Garnish with green onions and sesame seeds.
I’ve just returned from a trip to Tokyo and jet lag aside, it was everything my sushi-laden dreams are made of. I’m no early riser, but I even had sushi for breakfast one morning at Tsukiji fish market. The sushi was as good as I remembered it from my last trip a few years ago, and I’ve been craving it at home since I returned.
Thankfully, good sushi is within reach at home. For me, the toughest part is making the vinegared rice. I haven’t mastered it yet but I’ll keep trying until I get it right. It’s a great excuse to eat more sushi.
Ingredients:
1 1/2 cups sushi rice
1 2/3 cups water
1 4-inch piece of kombu seaweed
1/4 cup rice vinegar
2 tablespoons sugar
1/2 teaspoon salt
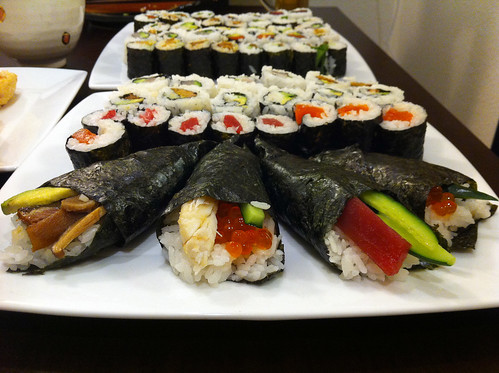
10 to 15 toasted nori seaweed sheets
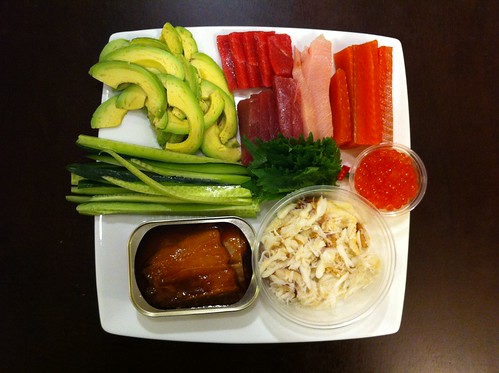
any assortment of the following filling ingredients: sliced sashimi-grade tuna, sliced sashimi-grade salmon, salmon roe, sea urchin, crab, barbecued eel, egg omelet, shiso leaves, takuan pickled daikon radish, sesame seeds, sliced cucumber, sliced avocado, green onions, soy-simmered shiitake mushrooms, umeboshi plums, soy-simmered kampyo gourd strips, cooked spinach
1. Make the vinegared rice: soak the kombu seaweed in the water for about one hour to make the stock. Wash the rice 30 minutes prior to cooking and drain on a sieve. Put the vinegar, sugar, and salt in a small pot and heat slightly until dissolved. This completes the vinegar dressing. Place the rice and stock into a rice cooker and cook according to cooker instructions. Transfer the rice to a large bowl and sprinkle with the vinegar dressing. Using a flat wooden spoon, toss the rice with horizontal cutting strokes while cooling the rice with a hand-fan. When tossing is completed, cover the rice with a clean cloth moistened with water.
2. Place a nori seaweed sheet on a maki-su bamboo mat. Put the vinegared rice lightly on the nori sheet and spread over the sheet, leaving 3/4-inch at the top and bottom uncovered.
3. Place filling ingredients of your choice horizontally on top of the rice.
4. Lift the edges of both the bamboo mat and nori sheet nearest you and bring over to meet the far edge of the sheet.
5. Gently but firmly press the bamboo mat around the roll to shape it. Push both ends of the rolls towards the center firmly a few times using a cloth or plastic wrap.
6. Cut in sixths or eighths crosswise. Clean the knife with water between cuttings. Serve with soy sauce, wasabi, and pickled ginger.