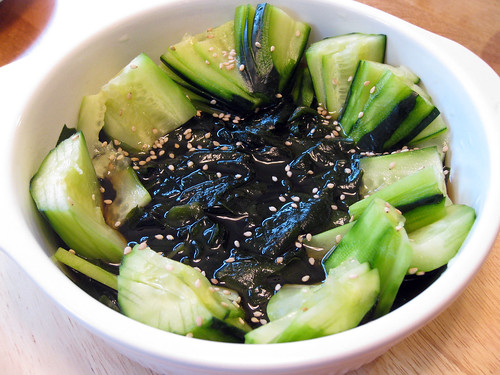
Kimchi Fried Rice

Posted on

I guess kimchi fried rice has officially arrived since I noticed last week that Trader Joe’s now sells it, prepared and frozen. But why?! I thought to myself. Kimchi fried rice is so easy to cook!

Kimchi is one of my favorite foods (at the moment I have three jars sitting in the fridge), and this is one of my go-to dinners. If you already have day old rice, putting this dish together takes only minutes. There are endless variations, but don’t substitute the butter. A little goes a long way here. Lastly, use overripe kimchi. If you have a jar that’s at least a couple of weeks old, the flavor will be perfect for fried rice.

Kimchi fried rice

Ingredients

1 cup overripe kimchi, cut into bite size pieces
2 cups day-old rice, chilled
2 tablespoons cooking oil
1 tablespoon butter
1/2 tablespoon gochujang, or Korean red pepper paste
1 teaspoon soy sauce
1 T sesame oil
1/2 green onion, thinly sliced
2 eggs
1/2 teaspoon shredded nori seaweed, for garnish

1. Heat a frying pan or wok on medium heat and add butter. Add the kimchi and fry for 5 minutes, until it is slightly browned. Add gochujang and stir. Remove kimchi from pan and set aside.

2. Add 1 tablespoon cooking oil to pan and fry 1 egg, stirring to break up into bite-sized pieces until cooked through, about 2 minutes. Add kimchi mixture back to pan.

3. Add the rice to pan and mix thoroughly. Add soy sauce and sesame oil and mix again. Turn off heat and the rice mixture aside.

4. Heat remaining tablespoon of oil in a small frying pan over medium heat and crack remaining egg in pan. Cover the pan and cook until the egg white is solid, about one minute.

5. To serve, put the rice mixture in a serving bowl, and top with the fried egg and shredded nori.

Ma Po Tofu

Posted on

Ma po tofu is ubiquitous on Chinese restaurant menus, but I never sampled the fiery, peppery dish until last year. It was mouth-numbingly hot, and it’s since become one of my favorite all-time dishes. As if to make up for lost time, I’ve spent the past few months eating ma po tofu constantly in restaurants and more recently, at home.

This homemade version of ma po tofu is just as delicious as what I’ve eaten from professional kitchens, and easy to cook. Ma po tofu is traditionally cooked with ground pork, but I substitute with chicken or turkey at home. The Sichuan peppercorns, however, are important to seek out as they’ll lend this dish that extra heat. It’s worth the pain (and slightly numb lips).

Ma po tofu

Ingredients:

3 dried shiitake mushrooms
6 ounces ground turkey
3 teaspoons soy sauce
4 teaspoons cornstarch
1 cup water
1/2 teaspoon sesame oil
1 tablespoon vegetable oil
1 teaspoon minced garlic
2 teaspoons hot bean paste
1/4 teaspoon toasted Sichuan peppercorns, ground
1/4 cup chopped water chestnuts
3 green onions, trimmed and cut into 1/2-inch pieces
1 14-ounce package soft tofu, drained and cut into 1/2-inch cubes

1. Pour enough warm water over the mushrooms in bowl to cover them completely. Soak until softened, about 20 minutes. Drain, discard the stems, and coarsely chop the caps.

2. Marinate the turkey: stir the ground turkey, 2 teaspoons of soy sauce, and 2 teaspoons of cornstarch together until evenly mixed. Let stand for 10 minutes.

3. Prepare the sauce:: stir the water, remaining two teaspoons soy sauce, and sesame oil together in a small bowl.

4. Heat a wok over high heat until hot. Add the oil and swirl to coat the sides. Add the garlic and stir-fry until fragrant, about 20 seconds. Add the turkey, hot bean paste, and Sichuan peppercorns and stir-fry until the turkey is crumbly, about 3 minutes.

5. Pour the sauce into the work, then stir in the mushrooms, water chestnuts and green onions. Slide the tofu into the work and stir gently to coat the tofu with the sauce and heat through, about 2 minutes.

6. In a small bowl, dissolve the remaining 2 teaspoons cornstarch in 2 teaspoons water. Pour the dissolved cornstarch into the wok and cook gently, stirring, until the sauce boils and thickens, about 1 minute. Spoon the tofu and sauce onto a serving platter and serve hot, alongside cooked rice.

Sichuan Dry-Fried Green Beans

Posted on

I used to hate green beans. Growing up, I inexplicably dreaded the loobia polo that most kids loved: an Iranian rice pilaf of green beans, browned lamb, tomatoes, and spices. It wasn’t until recently when I tried Sichuan-style dry-fried green beans that I’ve come around to loving the legume. It was the spicy, garlicy flavor that made me change my green bean-hating ways, and now, I can’t get enough.

Long beans are traditionally used in this recipe, but green beans work as well. Feel free to omit the ground chicken as well for a vegetarian version. Last but not least, make sure your beans are completely dry before frying them — this will ensure a blistered texture.

Sichuan dry-fried long beans

Ingredients:

2 tablespoons soy sauce
1 tablespoon cornstarch
1/2 pound ground chicken
1/4 cup chicken stock
1 tablespoon sugar
2 teaspoons minced garlic
2 teaspoons chili garlic sauce or chili bean sauce
1/4 teaspoon sesame oil
1 cup vegetable oil
3/4 pound green beans or long beans, ends trimmed and cut into 3-inch lengths

1. Marinate the chicken: stir 1 tablespoon of the soy sauce and cornstarch together in a medium bowl until the cornstarch is dissolved. Mix the chicken in the marinade until incorporated. Let stand for 10 minutes.

2. Prepare the sauce: stir the chicken stock, soy sauce, sugar, garlic, chili garlic sauce, and sesame oil together in a small bowl until the sugar is dissolved.

3 Pour the oil into a 2-quart saucepan and heat over medium-high heat. Carefully slip the green beans into the oil and cook, stirring continuously, until they are wrinkled, about 5 minutes. With a slotted spoon, transfer the beans to paper towels to drain. Reserve the oil.

4. Heat a wok over high heat until hot. Pour in 2 teaspoons of the reserved oil and swirl to coat the sides. Slide the chicken into the wok and stir-fry until the meat is crumbly and changes color, about 2 minutes. Add the green beans and sauce and stir until heated through, 1 to 2 minutes. Scoop the contents of the wok onto a serving plate and serve warm.

Pommes Sautees au Lard

Posted on

To be fair, there was no lard used in the making of this dish. I used turkey bacon instead. Please don’t judge me; the end product was still a garlicy plate of fried potato goodness.

Adapted from Anthony Bourdain’s Les Halles Cookbook, this wintery dish is a snap to create and makes a great side. The original recipe uses slab bacon but if you’re cutting down on the fat, use a mixture of turkey bacon and butter, as I did.

Pommes sautees au lard

Ingredients:

4 slices turkey bacon, chopped into a 1/4-inch dice
2 tablespoons butter
2 Yukon Gold potatoes, peeled, cut in half, then chopped into 1/4-inch thick slices
1 garlic clove, minced
4 sprigs of flat parsley, chopped
salt and pepper

1. Heat a saute pan over medium heat and add the butter until melted. Add the bacon and cook until the fat is rendered and the meat is crispy, about 5 minutes, stirring occasionally.

2. Add the potatoes and cook for 15 minutes, stirring and tossing frequently. Add the garlic and cook for 2 minutes, then season with parsley, salt, and pepper. Serve warm.

Okonomiyaki

Posted on

The first time I tried okonomiyaki, I had just moved in with my new roommates for college, two of whom were from Japan: Sanae from Tokyo and Sanae from Osaka. Throughout the year, I was fortunate to learn to cook all kinds of regional dishes with them, many of which can be hard to find in restaurants.

Okonomiyaki was the first homestyle Japanese dish that they taught me, and to this day, it remains one of my favorites. Loosely translated as “as you like it,” okonomiyaki is a savory pancake consisting of varying filling ingredients but the flour, egg, cabbage, and dashi base remain consistent.

Okonomiyaki, part one

My version of okonomiyaki is pretty standard, albeit without the mountain yam that can be so hard to track down. When I was in Japan two years ago, I tried a delicious rendition in Kyoto that had a fried noodle base, as well as another version with melted cheese and dried anchovies, so the possibilities are endless. The ingredient list might be daunting, but it’s worth the search – and oh, don’t forget the giant octopus tentacle.

Okonomiyaki, part two

Ingredients:

1/2 cup all-purpose flour
2/3 cup dashi stock
1 egg
1 cup cabbage, shredded
2 green onions, thinly sliced
benishoga red pickled ginger, chopped (not to be confused with gari pickled ginger, which is commonly served alongside sushi)
3 inches cooked octopus, finely chopped
1 handful dried bonito flakes
1/2 teaspoon dried nori flakes
okonomi sauce (available in Japanese and well-stocked Asian grocers)
Japanese-style mayonnaise (I recommend Kewpie brand)
vegetable oil

1. Place the flour and dashi stock in a bowl, and mix well. Add the cabbage, onion, benishoga ginger, octopus, and egg to the bowl, and mix well.

2. Heat a nonstick frying pan over medium-high heat and add one tablespoon vegetable oil. Pour 1/3 cup of the batter mixture into the pan, and sprinkle a few dried bonito flakes on top. Cook for about 3 minutes.

3. Carefully flip the pancake over, and cook for about 4 minutes. Reverse again, and cook for another 4 minutes. Transfer the pancake to a serving plate.

4. Spread okonomi sauce and mayonnaise on top of the pancake, and sprinkle with dried nori and bonito flakes.

5. Repeat steps 2 to 4 until batter is finished.